During the operation of a computer system, you may encounter an error message stating “xinput9_1_0.dll not found” when users or applications attempt to access certain functions. This issue is typically caused by a missing or corrupted system file. Many games, software, or tools that depend on the “xinput9_1_0.dll” file may face immediate failures upon launch, such as the program not starting or failing to load.
What is xinput9_1_0.dll?
xinput9_1_0.dll is a DLL file (Dynamic Link Library) within the computer’s file system. It serves to convert physical actions performed on a game controller, such as pressing buttons or moving a joystick, into digital signals that software applications can understand and process. This enables the precise digital response of button presses and joystick movements to be reflected on the screen.
xinput9_1_0.dll is utilized across various versions of Windows, including Windows XP, Windows Vista, Windows 7, Windows 8, and Windows 10. It is typically located in C:\Windows\System32 (for 32-bit DLLs on 64-bit systems) or C:\Windows\SysWOW64 (for 64-bit DLLs on 64-bit systems).
The issue with “xinput9_1_0.dll” may arise from various factors, such as the DLL file being corrupted, accidentally deleted, or not being found by the software. The problem can manifest as an error message (indicating the absence or an error with the file), an unresponsive state, or inaccurate software responses to inputs from the controller. All of these can significantly diminish the user’s interactive experience and immersion.
xinput9_1_0.dll Error Messages
Errors related to xinput9_1_0.dll can occur for several reasons. For example, they may arise from bugs in the application, or the xinput9_1_0.dll file may have been deleted, misplaced, or corrupted by malicious programs present on the PC, or due to corruption in the Windows registry.
The most commonly occurring error messages are:
- The program can’t start because xinput9_1_0.dll is missing from your computer. Try reinstalling the program to fix this problem.
- There was a problem starting xinput9_1_0.dll. The specified module could not be found.
- Error loading xinput9_1_0.dll. The specified module could not be found.
- The code execution cannot proceed because xinput9_1_0.dll was not found. Reinstalling the program may fix this problem.
In most cases, the solution is to correctly reinstall xinput9_1_0.dll into the PC or Windows system folders. Additionally, especially for PC games, it may be necessary to place the DLL file into the game’s or application’s installation folder.
How to Fix xinput9_1_0.dll Errors
After understanding the importance of xinput9_1_0.dll and the reasons for its corruption, you can proceed to fix the xinput9_1_0.dll errors. Please follow the methods below:
Method 1: Restart the Computer
Sometimes, simply restarting can resolve temporary issues and clear the error. If you are using a game controller, ensure it is correctly connected and functioning.
Method 2: Reinstall the Game or Software
If the xinput9_1_0.dll error started occurring after installing a specific application, try uninstalling and then reinstalling the application. This can help restore any lost or corrupted files.
- Open the Start menu and search for “Apps and Features.”
- Select “Programs and Features” – find “Xbox 360 Controller” and choose “Uninstall.”

- Locate the necessary application and click “Uninstall.”
- Download the latest version from the official website of the application and reinstall it.

Method 3: Use Bitwar DLL Fixer to Repair xinput9_1_0.dll
Missing DLL files can cause various errors. These files are essential for software to function properly. Fortunately, using a DLL repair tool like Bitwar DLL Fixer can help restore the lost xinput9_1_0.dll.
Bitwar DLL Fixer features a comprehensive database of DLL files and can automatically scan the system to detect missing or corrupted DLL files. Moreover, it can automatically reinstall the necessary DLLs into their respective application directories.
Bitwar DLL Fixer Official: https://www.bitwarsoft.com/dll-fixer
Free Download Bitwar DLL Fixer:

How to Repair xinput9_1_0.dll Using Bitwar DLL Fixer
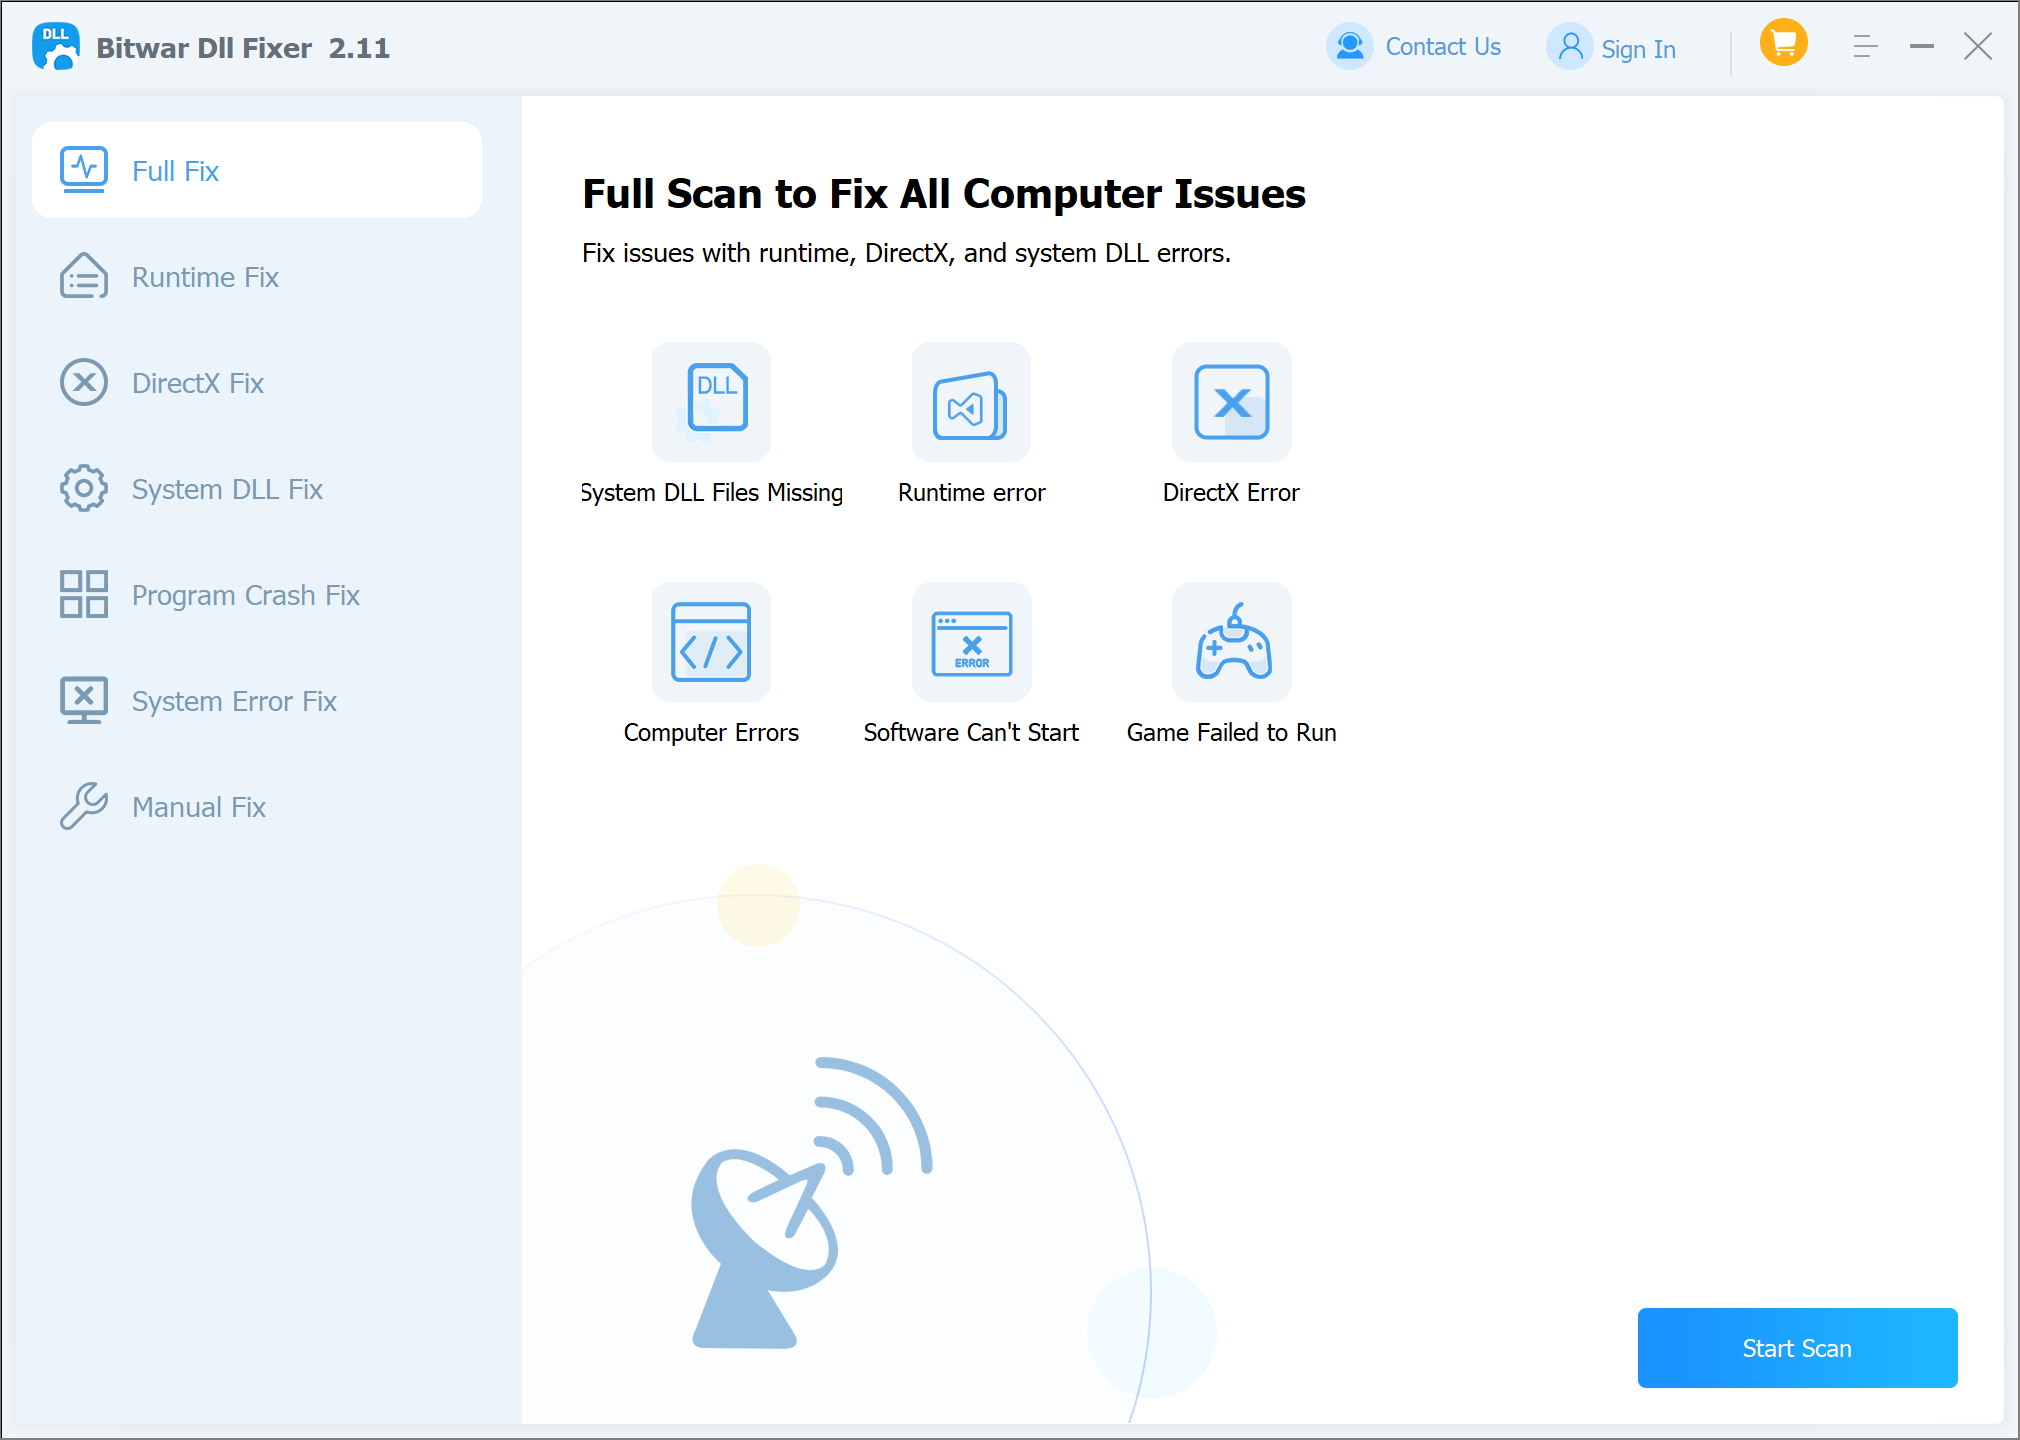
- Download and launch Bitwar DLL Fixer. From the left menu, select either “Full Repair” or “DirectX Repair.”
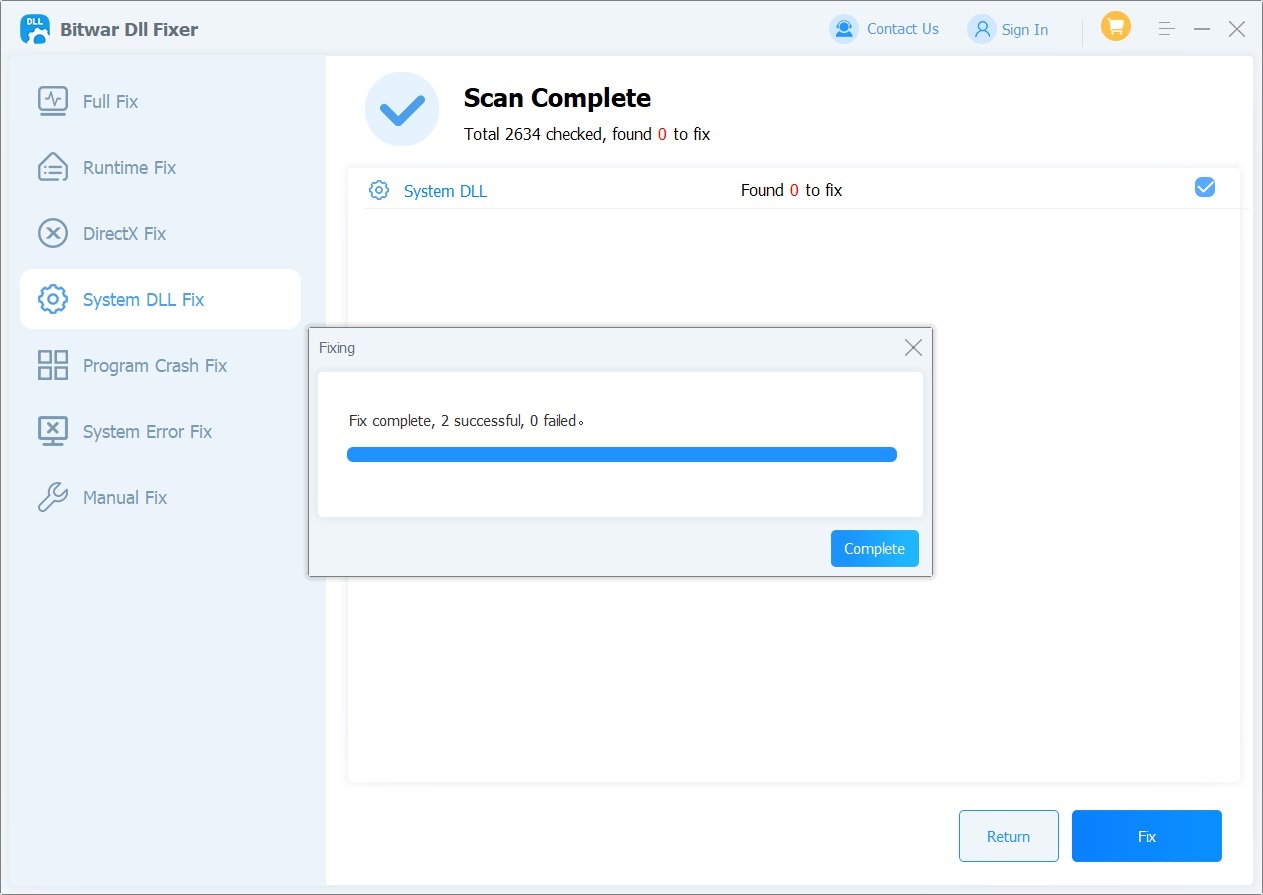
- Click on “Start Scan” and wait for the scan to complete. After reviewing the listed DLL files, click the “Repair” button to fix the erroneous DLL files.
- Once the repair is complete, a notification will appear on the screen. Then, launch the related programs to check if the xinput9_1_0.dll issue is resolved.
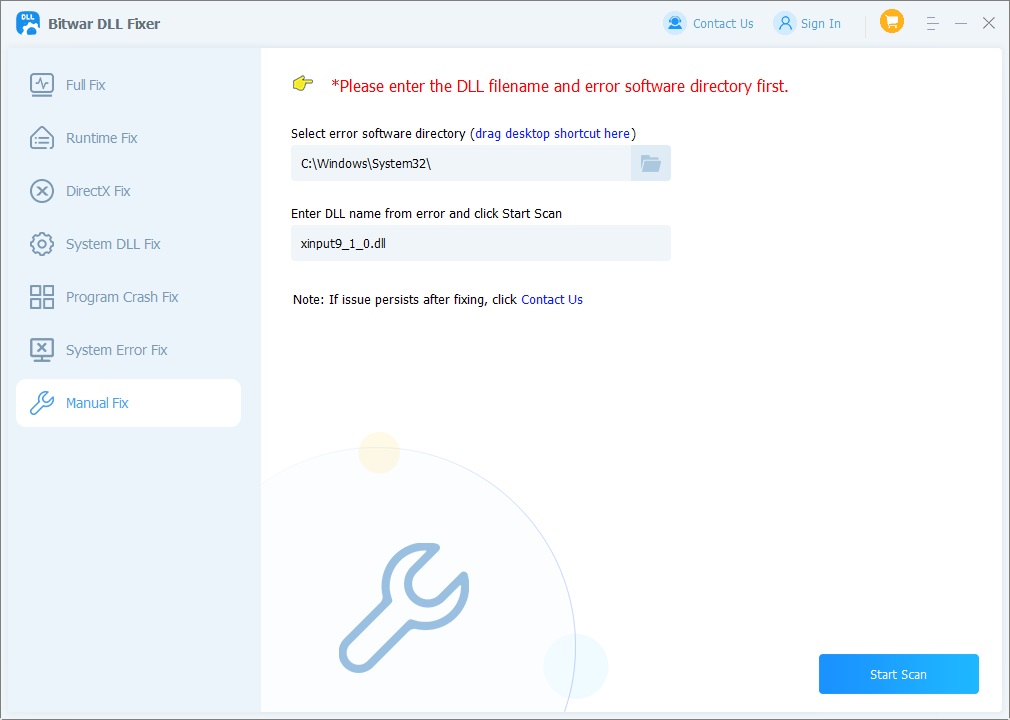
Note: If the xinput9_1_0.dll file you want to repair is not found with “Manual Repair,” you can attempt a manual repair.
Method 4: Update or Reinstall DirectX
xinput9_1_0.dll is part of the DirectX library. Download and install the latest version of DirectX from the official Microsoft website.
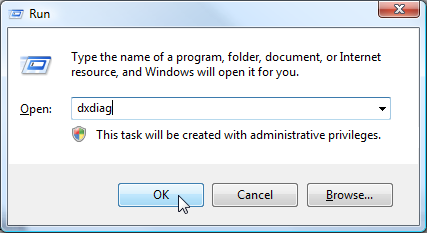
- Press the “Windows” key and type “dxdiag” in the search bar. Click to open “dxdiag.exe” displayed in the results. Check the currently installed version of DirectX.
- Open a web browser and go to the DirectX download page.
- Click the “Download Now” button to download the DirectX End-User Runtime.
- Once the download is complete, double-click the file to run it. When the installation wizard appears, follow the on-screen instructions to proceed with the installation.
- After the installation is complete, restart the computer.
- After rebooting, use “dxdiag” again to check if the version of DirectX has been updated.

After reinstalling or repairing DirectX, check if the xinput9_1_0.dll error recurs.
Method 5: Restore the xinput9_1_0.dll File
- Download the xinput9_1_0.dll file from a reputable DLL website. Copy the downloaded xinput9_1_0.dll file to the following directories:
- System32 folder: C:\Windows\System32\
- For 64-bit systems: C:\Windows\SysWOW64\
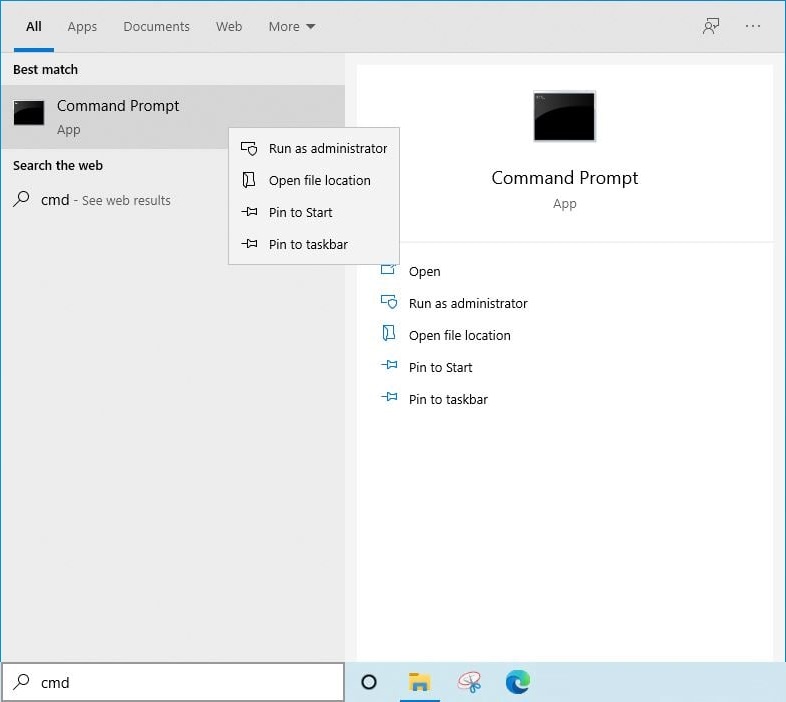
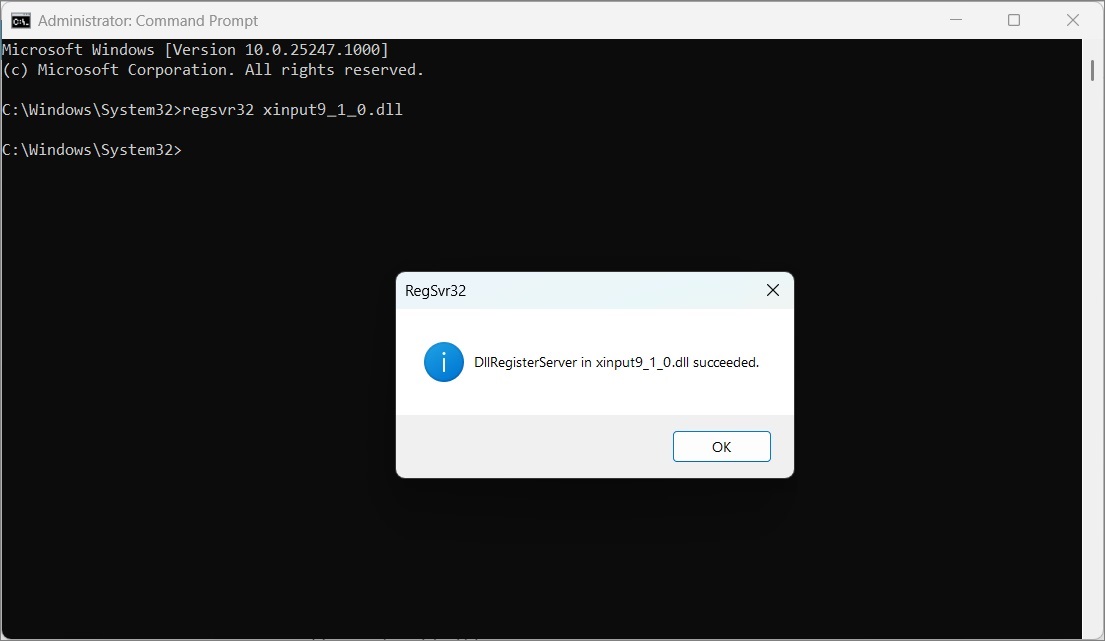
- Right-click the Start menu and select “Command Prompt (Admin).”
- Type the command
regsvr32 xinput9_1_0.dlland press Enter.
Method 6: Run a Virus Scan
Use antivirus software to scan for malware that may have deleted or corrupted the DLL file.
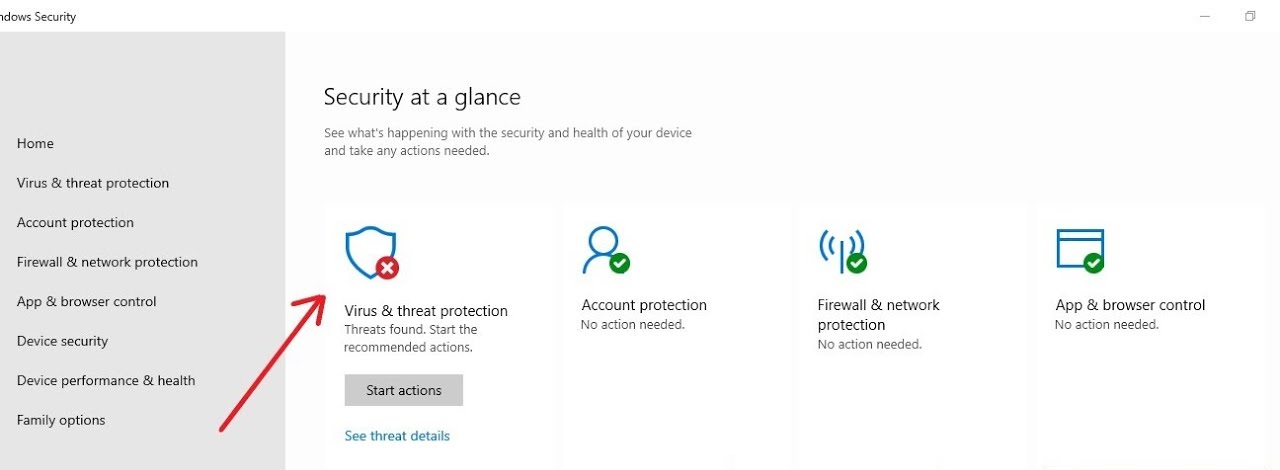
- Type “Windows Security” in the Windows search bar and press Enter.
- Select “Virus & threat protection.”
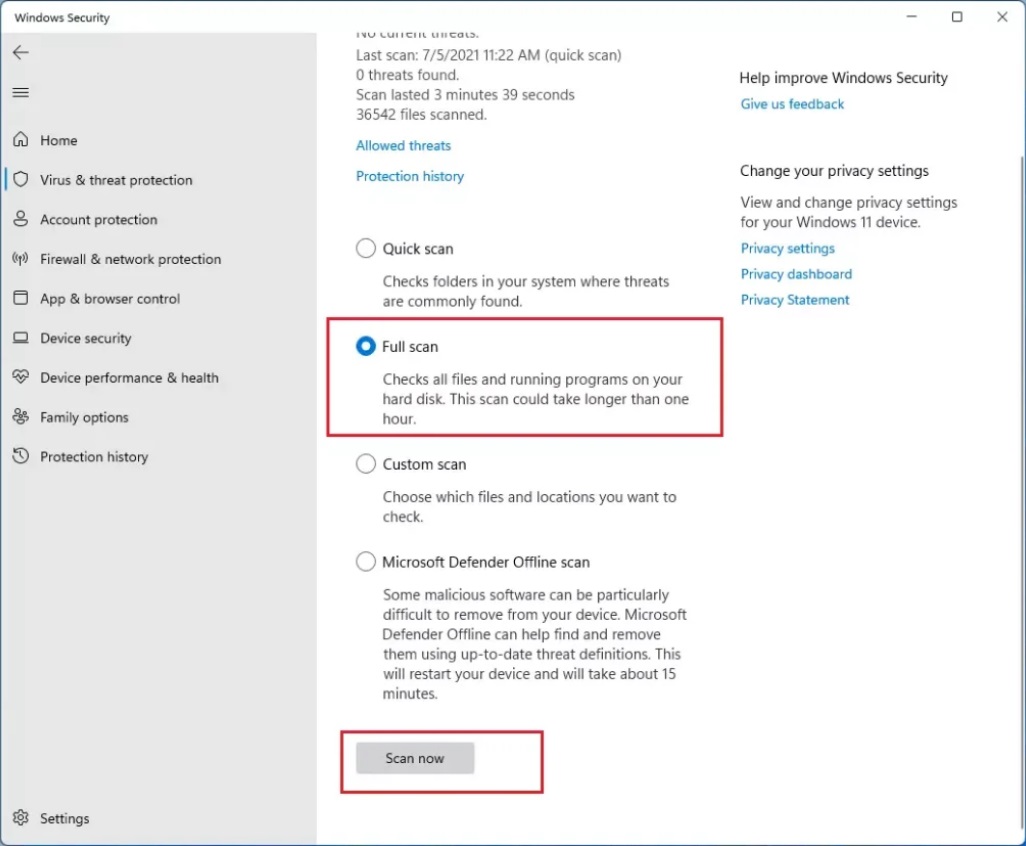
- Choose “Scan options.”
- Select “Full scan” and click “Scan now.”
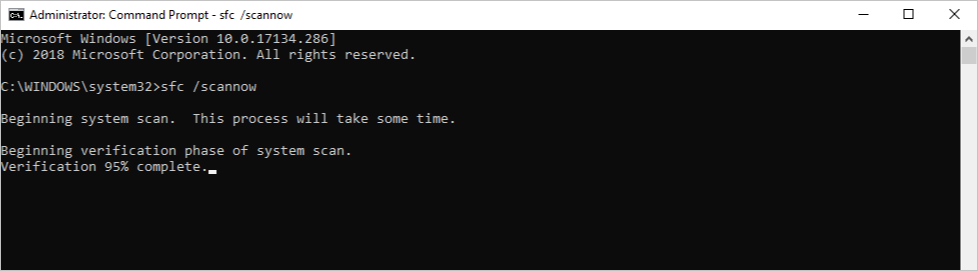
Method 7: Check Windows System Files
Open Command Prompt as an administrator and run the command: sfc /scannow. This will scan for and attempt to repair corrupted system files.
- Open Command Prompt with administrative privileges. To do this, right-click the Start button and select “Windows PowerShell (Admin)” or “Command Prompt (Admin).”
- Type the following command and press Enter:
sfc /scannow. - Restart your computer to apply the changes.
Method 8: Install Windows Updates
Ensure that the Windows operating system is up-to-date by installing any pending updates.
Here are the steps to check for Windows updates:
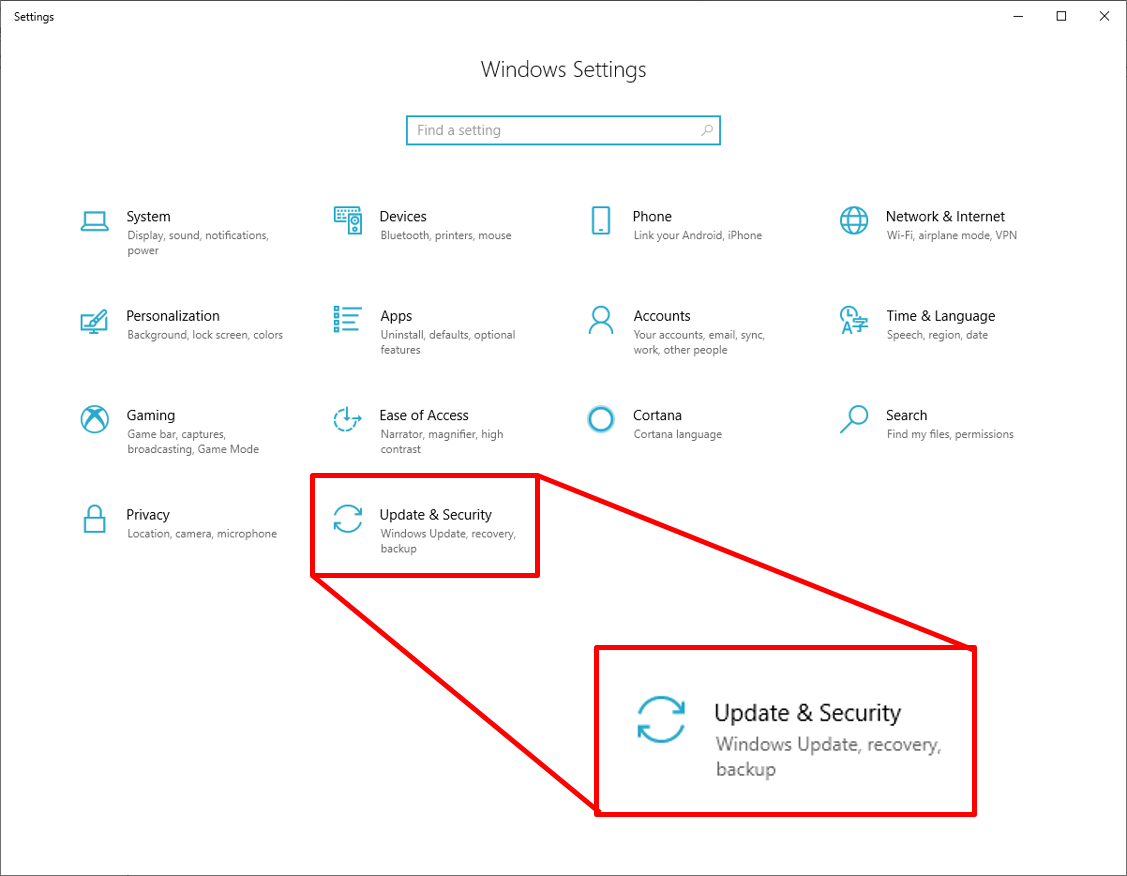
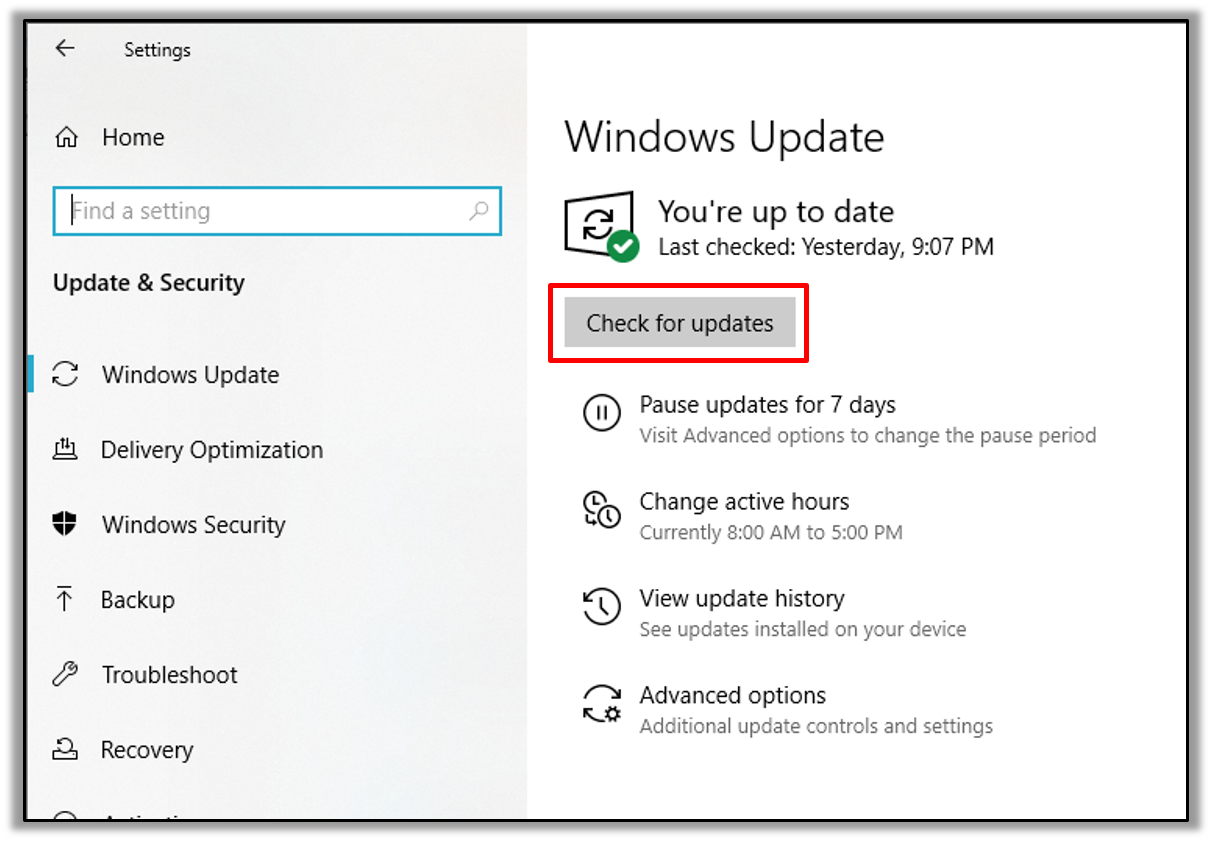
- Press
Windows key + Ito open Windows “Settings.” Click on the “Update & Security” tab. - Click on Windows Update and then click the “Check for updates” button to scan for available updates. Any updates that need to be installed will be automatically downloaded and installed.
To check for updates for other software, open that program and look for an “Check for updates” option in the menu. Alternatively, you can visit the official website of the software to check for updates as well.
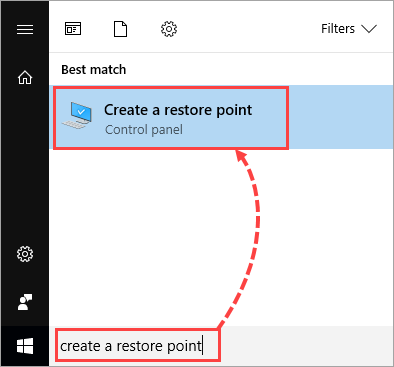
Method 9: Perform a System Restore
If the errors started occurring recently, you can use System Restore to revert to a previous state where your system was functioning correctly.
- First, click the Start menu and type “Create a restore point” in the search bar, then press Enter.
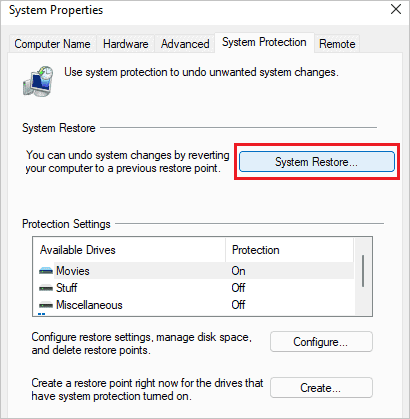
- The System Properties window will appear; click the “System Restore” button under the “System Protection” tab.
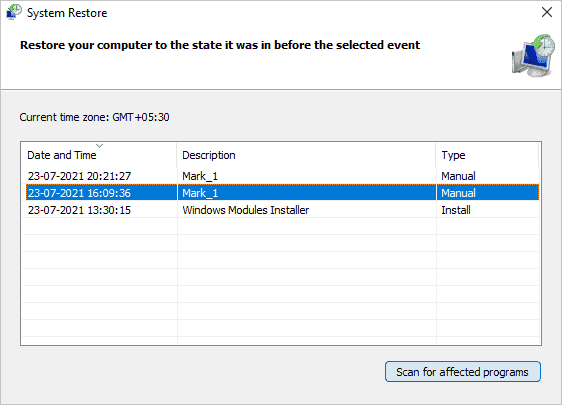
- In the System Restore window, click “Next” and wait for the list of available restore points to be displayed. Select a restore point that was created before the problems began. You can click “Scan for affected programs” to see which programs will be affected by the restore.
- After selecting the restore point, click “Next” and confirm your selection by clicking “Finish.” A warning will appear indicating that system restore cannot be interrupted; click “Yes” to proceed. This will cause the computer to restart, and the restore process will begin. The process may take some time.
- Once the restoration is complete, the computer will return to Windows, and a message will indicate whether the restore was successful.

Method 10: Clean Up the Registry
Use a trusted registry cleaner to fix registry issues that could be causing the error. Be sure to back up the registry before making any changes. You may also consider using third-party registry cleaning software.
Note that registry editing carries risks. If you do not understand the impact of cleanup options on your system, please skip this method.
Summary
By following these steps, you should be able to resolve errors related to the xinput9_1_0.dll file and restore the functionality of your system. However, if you are looking for a quick and effective way to fix DLL errors related to applications or games, we recommend using Bitwar DLL Fixer. This tool can repair corrupted or missing DLL files caused by various issues.
Free Download Bitwar DLL Fixer: